
Image list with EXIF tags
With the menu item "Images" → "Image list of a folder" you can show, edit and remove EXIF tags of JPEG, TIFF and PNG image files.
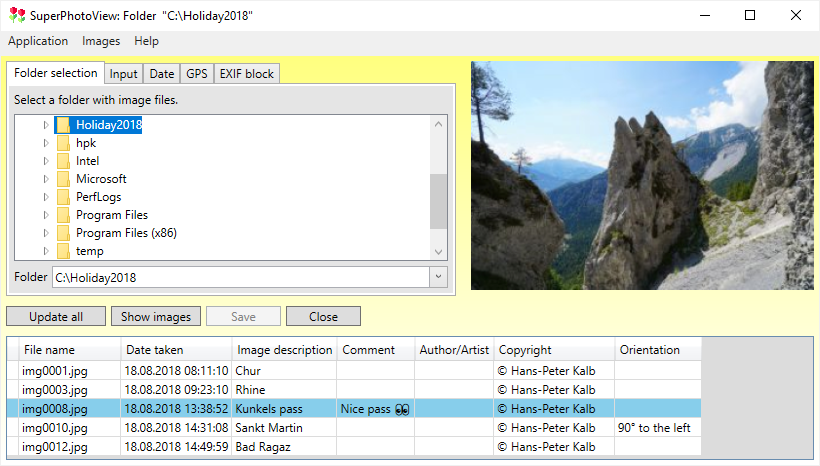
In the tab sheet "Folder selection" you select the folder in which the image files are stored. The EXIF tags of the images are then shown in the data table below.
Selection and display order of EXIF tags
When you open the window for the first time, only the most important EXIF tags are shown. You can choose more EXIF tags or hide EXIF tags by clicking with the right mouse button into the header of the data table. Then a context menu with check box items opens where you can check and uncheck the EXIF tags using the left mouse button:
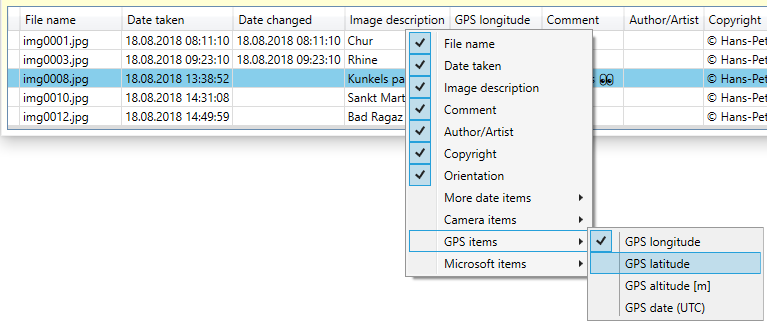
It is also possible to change the display order of the EXIF tags in the data table by pulling the EXIF item in the header with the left mouse button.
Edit and remove EXIF tags
With the tab sheet "Input" you can enter a new value for an EXIF tag. This value applies to all currently selected images in the data table.
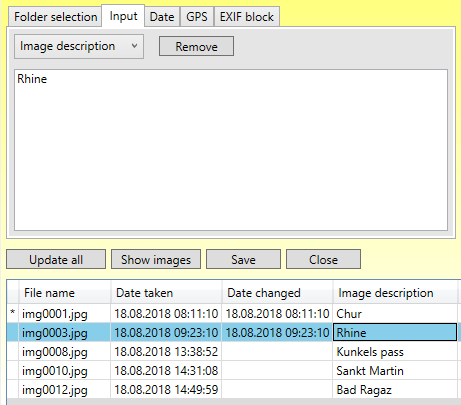
- The EXIF tag to be edited is selected by clicking with the left mouse button into the data cell, which belongs to the EXIF tag and the desired image. The content of the EXIF tag can then be edited in the control of the tab sheet "Input".
- Furthermore it is possible to select the EXIF tag with the combo box in the upper left corner of the tab sheet "Input".
- If only one image is selected, the EXIF data entered are directly updated in the data table, but they are not yet written to the image file.
- If you select multiple images by using the Ctrl or Shift key, an additional button "Apply" is shown. Only after pressing this button, the EXIF data are updated in the data table, but they are not yet written to the image files.
- An EXIF tag can be removed by pressing the button "Remove" in the tab sheet "Input".
With the button "Save" you can write all EXIF data changes to the image files. After this, the changes are permanent and cannot be undone!
Rotate images
The images can be rotated losslessly by 90° or 180° using the EXIF tag "Orientation".
Sort images
The images can be sorted by an EXIF tag, such as the date taken. For this click with the left mouse button on the EXIF tag in the header of the data table. Then the images are sorted in ascending order. A second mouse click sorts them in descending order.
Special date and time operations
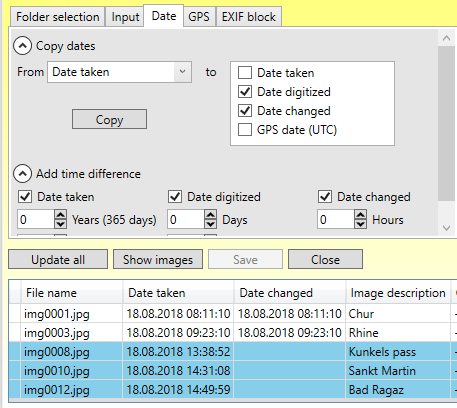
With the tab sheet "Date" you can perform special operations for the EXIF tags which hold a date and time:
- Copy a date from one EXIF tag to another within the same image file.
- Add a time difference to one or more EXIF tags.
GPS operations
Smartphones often write the GPS location where the photo was taken. With the "GPS" tab sheet the following operations are available:
- Show the GPS location of the currently selected image in Google Maps or Open Street Map. Only one image may be selected at once and the standard browser of the operating system is used for showing the location.
- Remove all GPS EXIF tags from the selected image files.
Block operations
In the tab sheet "Block operations" you can perform the following operations:
- Replace the EXIF block of the selected image files by an EXIF block, that is specified by the file name in the text box. In the case of TIFF files, however, the TIFF internal EXIF tags are not replaced.
- Remove entire EXIF block. In the case of TIFF files, however, the TIFF internal EXIF tags are not removed.
- Remove EXIF thumbnail image.
- Remove EXIF padding tags. These tags are space reservations for an enlargement of the EXIF block. E. g., if you write meta data with the Windows 10 Explorer two such tags with each 2 kilobytes are created.
- Remove IPTC block. This is an alternative meta data block.
- Remove XMP block. This is like the IPTC block an alternative meta data block. E. g., if you write meta data with the Windows 10 Explorer an XMP block is automatically added to the image file.
- Remove JPEG comment block. JPEG files have an area where an arbitrary text can be placed.
- Remove PNG meta data blocks. For PNG files an own meta data format exists that is stored in these blocks.
View images in a slide show
You can view the images in a slide show by pressing the button "Show images". Then the following selection window appears:
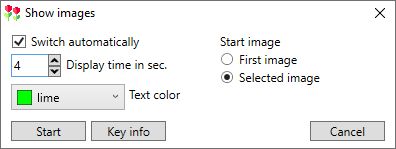
Here, the following setting options are available:
- You can choose between automatic and manual switching to the next image.
- In case of automatic switching you can specify the display time of an image.
- The text color for the image descriptions is selectable.
- If you want to view only part of the images, you can start the slide show with the currently selected image.
- With the button "Start" the slide show is started. In order to switch to the next image press the arrow key to the right on the PC keyboard. With the "Esc" key the slide show is closed. A table with all available keys appears by clicking the button "Key info".